







Small wire parts can make a miniature chair, shelf, lamp, or railing look delicate and convincing. They can also reveal every dent and uneven angle. The goal is not to use more force; it is to control where the wire is held, where it bends, and how each copy is measured.
Where Wire Bending Appears in Rolife Kits
Depending on the kit design, craft wire may appear in miniature plant stems, vines, lamps, signs, railings, chair legs, table frames, or other decorative details. Some more hands-on Rolife miniature house kits may use wire shaping as part of the building experience, while beginner-friendly or snap-fit kits may require little or no wire bending.
If the wire is part of a lighting circuit, battery connection, or LED component, do not treat it as decorative craft wire. Follow the kit manual and do not bend, cut, or reshape electrical wires unless the instructions specifically direct you to do so.
This guide is therefore not a claim that every Rolife product requires wire bending. It is intended for the kits and decorative details where shaping wire is an actual part of the hands-on build and a cleaner, more repeatable result matters.
Which Tools Produce the Cleanest Bends?
| Tool | Best use | Watch for |
|---|---|---|
| Smooth-jaw flat-nose pliers | Straight sections and crisp angles | Serrated jaws can imprint soft wire |
| Round-nose pliers | Curves, loops, and rounded corners | Different jaw positions create different diameters |
| Nylon-jaw pliers | Holding or straightening visible wire | Soft jaws wear and may reduce grip |
| Flush cutters | Trimming ends close to the final shape | The cut end may be sharp |
| Ruler and fine marker | Repeatable bend locations | Thick marks reduce accuracy at miniature scale |
| Mandrel, dowel, or simple peg jig | Consistent curves and repeated parts | The form must match the desired inside radius |
If you are assembling a kit, first check the recommended tools in What Tools Do I Need for Rolife Kits?. Use the kit manual whenever its method differs from general craft advice.
How Should You Prepare the Wire Before Bending?
- Confirm what the wire does. Decorative craft wire can be shaped; electrical or LED wiring needs different handling. Disconnect batteries or power before touching any circuit component.
- Identify the visible side. Plan to grip hidden areas where possible so any small mark is less noticeable.
- Straighten gently. Roll the wire lightly under a smooth flat object or draw it through nylon-jaw pliers without crushing it. Stop if the coating stretches or flakes.
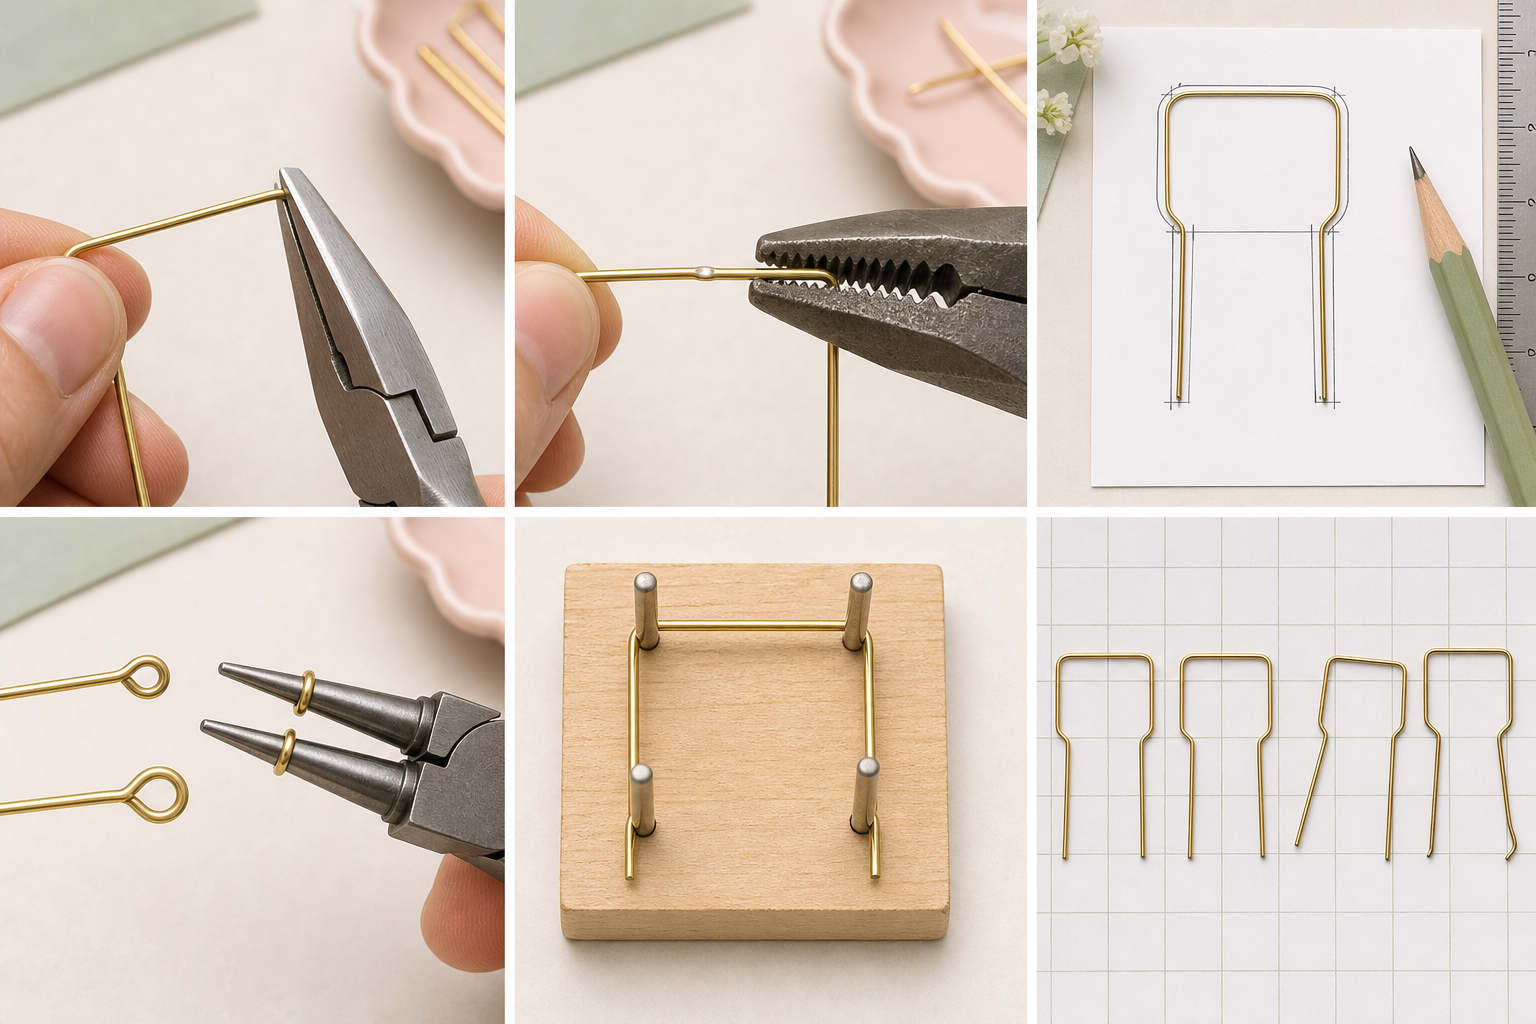
- Draw a full-size pattern. Sketch the part at 1:1 scale on paper, including the center of each bend and the finished length.
- Test a short offcut. Different wire materials and thicknesses respond differently. A test tells you how tightly the wire can turn and whether your tools leave marks.
How Do You Make a Clean, Repeatable Bend?
- Mark the bend center. Use the smallest visible mark possible. For repeated parts, measure from the same reference end each time.
- Place the wire consistently in the jaws. If you use round-nose pliers, mark the jaw position so every curve forms around the same diameter.
- Grip beside the bend, not across the finished face. Use only enough pressure to prevent slipping.
- Form the bend in one controlled movement. Avoid flexing the same point backward and forward; repeated correction can create a kink or weaken the wire.
- Compare it with the paper pattern. Make small adjustments along a broader section rather than forcing the bend at one sharp point.
- Keep the first good piece as a master. Place later parts over it or over the paper drawing to check length and angle.
- Trim only after the important bends are established. A longer tail is easier to hold and gives you room for minor corrections.
How Can You Prevent Pliers From Marking the Wire?
The most reliable solution is a tool with smooth contact surfaces. Nylon-jaw pliers are useful for holding or straightening visible sections, while polished smooth-jaw pliers give more precise control at a corner.
A thin, removable barrier over a clean jaw can reduce marking during a one-off repair, but it also changes the grip and bend radius. Test it on an offcut first. Do not rely on a thick wrap when two matching bends need to be highly consistent.
- Clean dust, dried adhesive, or metal filings from the jaws before use.
- Use the minimum gripping pressure that keeps the wire from sliding.
- Hold a hidden tail or underside whenever the shape allows it.
- Avoid serrated household pliers on soft, coated, or highly visible wire.
How Do You Make Matching Chair Legs or Frames?
Repeated parts are easier with a jig than with repeated measuring. Draw the finished shape on a scrap board or thick card, then place smooth pins or small round forms at the key corners. Guide the wire around the same points for each copy. Keep the jig simple enough that the finished part can be lifted out without opening the bends.
For square or rectangular frames
Start from the same end, make bends in the same order, and check each angle against the drawing. A small square or the corner of a rigid card can help you compare angles without squeezing the wire again.
For rounded chair backs and rails
Choose a mandrel, dowel, or smooth tool handle that matches the desired inside curve. Wrap the wire around the form in one direction and stop at the marked endpoints. Do not pull so hard that the wire flattens or the coating stretches.
For coils and loops
Use the same marked position on round-nose pliers or the same diameter mandrel. Leave a handling tail until the loop is complete, then trim and smooth the end if the design allows.
What Common Wire-Bending Mistakes Cause Kinks?
| Problem | Likely cause | Better approach |
|---|---|---|
| A sharp dent at the bend | Serrated jaws or excessive pressure | Use clean smooth jaws and grip more lightly |
| Two legs do not match | Each part was measured independently | Use one reference end, a master piece, or a jig |
| The curve becomes lumpy | Several small corrections were made at one point | Shape around one consistent form in a controlled movement |
| The final part is too short | Wire was cut before the bends were tested | Keep extra length and trim near the end |
| The coating cracks | The bend is too tight or the wire has been reworked | Increase the radius or replace the damaged section |
When Should You Stop Adjusting and Replace the Wire?
Replace the piece if it has a sharp kink in the wrong location, visible cracking, a damaged coating, or a weak point created by repeated bending. Continuing to correct a compromised piece usually makes the final shape less predictable. If the wire is supplied for a functional light or circuit, do not substitute material unless the manual or support guidance confirms it is suitable.
Key Takeaway
Not every Rolife kit requires wire shaping. When a kit does include decorative wire details, clean results come from repeatable references: a full-size pattern, a consistent jaw position, one test piece, and a simple jig for duplicates. Shape once, compare carefully, and protect visible surfaces from unnecessary gripping.
Frequently Asked Questions
What pliers are best for miniature wire?
Smooth-jaw flat-nose pliers are useful for controlled angles, while round-nose pliers create curves and loops. Nylon-jaw pliers can hold or straighten visible wire with less risk of marking it.
How do I bend wire without scratching its coating?
Use clean smooth or nylon jaws, grip hidden areas where possible, and test your pressure on an offcut. If the coating still stretches or flakes, use a larger bend radius or replace the wire.
How can I make two wire legs the same size?
Measure from the same reference end, make bends in the same order, and compare each piece with a master or a simple peg jig rather than measuring every part from scratch.
Can I bend the wire used for miniature LED lights?
Do not treat electrical wire like decorative craft wire. Disconnect power, avoid damaging insulation or connections, and follow the kit manual. Contact product support if a functional wire needs repair or replacement.
What should I do if the wire is already kinked?
A shallow curve may be improved gradually over a wider area, but a sharp kink often remains visible and may weaken the piece. Replacing the section is usually cleaner than repeatedly bending the same point.
Need More Help With a Build?
If a part has already been bent, misplaced, or damaged, use How Do I Fix Mistakes While Building a Rolife Kit? before forcing it back into shape. When you need to pause, follow How Should I Store an Unfinished Rolife Kit Between Building Sessions? so the wire and reference parts stay organized.
For kit-specific symbols and part order, review How Do I Read a Rolife Instruction Manual?. If the supplied piece is missing, cracked, or unusable, see What Should I Do If Parts Are Missing or Damaged? instead of substituting an unverified wire.